
TextInnerShadow


| Demo | Attribute Name | Class |
|---|---|---|
|
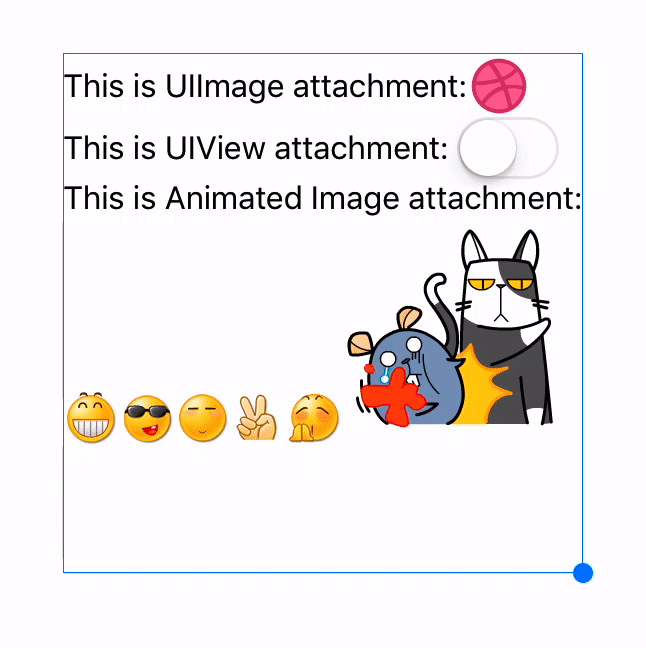
TextAttachment | TextAttachment |
|
TextHighlight | TextHighlight |
|
TextBinding | TextBinding |
|
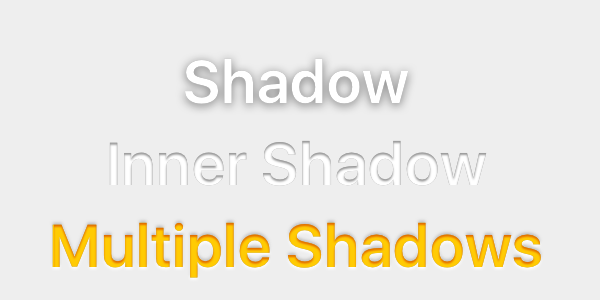
TextShadow TextInnerShadow |
TextShadow |
|
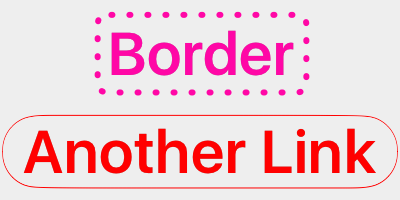
TextBorder | TextBorder |
|
TextBackgroundBorder | TextBorder |
|
TextBlockBorder | TextBorder |
|
TextGlyphTransform | NSValue(CGAffineTransform) |
|
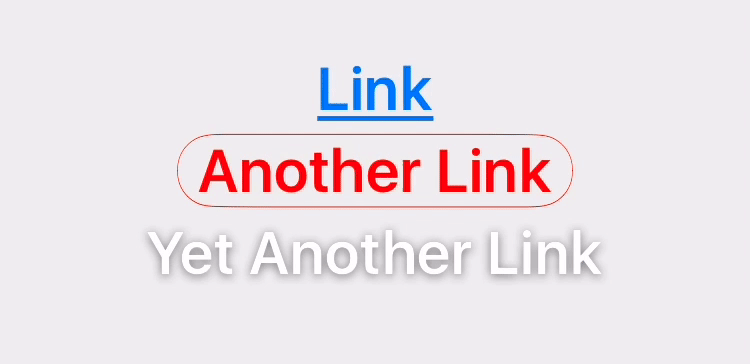
TextUnderline | TextDecoration |
|
TextStrickthrough | TextDecoration |
|
TextBackedString | TextBackedString |
| Demo | Attribute Name | Class |
|---|---|---|
 |
Font | UIFont(CTFontRef) |
 |
Kern | NSNumber |
 |
StrokeWidth | NSNumber |
 |
StrokeColor | CGColorRef |
 |
Shadow | NSShadow |
 |
Ligature | NSNumber |
 |
VerticalGlyphForm | NSNumber(BOOL) |
 |
WritingDirection | NSArray(NSNumber) |
 |
RunDelegate | CTRunDelegateRef |
 |
TextAlignment | NSParagraphStyle (NSTextAlignment) |
 |
LineBreakMode | NSParagraphStyle (NSLineBreakMode) |
 |
LineSpacing | NSParagraphStyle (CGFloat) |
 |
ParagraphSpacing ParagraphSpacingBefore |
NSParagraphStyle (CGFloat) |
 |
FirstLineHeadIndent | NSParagraphStyle (CGFloat) |
 |
HeadIndent | NSParagraphStyle (CGFloat) |
 |
TailIndent | NSParagraphStyle (CGFloat) |
 |
MinimumLineHeight | NSParagraphStyle (CGFloat) |
 |
MaximumLineHeight | NSParagraphStyle (CGFloat) |
 |
LineHeightMultiple | NSParagraphStyle (CGFloat) |
 |
BaseWritingDirection | NSParagraphStyle (NSWritingDirection) |
 |
DefaultTabInterval TabStops |
NSParagraphStyle CGFloat/NSArray(NSTextTab) |
 # Installation
### CocoaPods
1. Add `pod 'BSText'` to your Podfile.
2. Run `pod install` or `pod update`.
3. Import Module `import BSText`, use `@import BSText;` in OC project.
### Carthage
1. Add `github "a1049148527/BSText"` to your Cartfile.
2. Run `carthage update --platform ios` and add the framework to your project.
3. Import Module `import BSText`, use `@import BSText;` in OC project.
### Manually
1. Download all the files in the `BSText` subdirectory.
2. Add the source files to your Xcode project.
3. Link with required frameworks:
- UIKit
- CoreFoundation
- CoreText
- QuartzCore
- Accelerate
- MobileCoreServices
4. Now you can use it.
### Notice
You may add [YYImage](https://github.com/ibireme/YYImage) or [YYWebImage](https://github.com/ibireme/YYWebImage) to your project if you want to support animated image (GIF/APNG/WebP).
# Documentation
API documentation is same as YYText, you can see it on [CocoaDocs](http://cocoadocs.org/docsets/YYText/).
# Installation
### CocoaPods
1. Add `pod 'BSText'` to your Podfile.
2. Run `pod install` or `pod update`.
3. Import Module `import BSText`, use `@import BSText;` in OC project.
### Carthage
1. Add `github "a1049148527/BSText"` to your Cartfile.
2. Run `carthage update --platform ios` and add the framework to your project.
3. Import Module `import BSText`, use `@import BSText;` in OC project.
### Manually
1. Download all the files in the `BSText` subdirectory.
2. Add the source files to your Xcode project.
3. Link with required frameworks:
- UIKit
- CoreFoundation
- CoreText
- QuartzCore
- Accelerate
- MobileCoreServices
4. Now you can use it.
### Notice
You may add [YYImage](https://github.com/ibireme/YYImage) or [YYWebImage](https://github.com/ibireme/YYWebImage) to your project if you want to support animated image (GIF/APNG/WebP).
# Documentation
API documentation is same as YYText, you can see it on [CocoaDocs](http://cocoadocs.org/docsets/YYText/).| Demo | Attribute Name | Class |
|---|---|---|
|
TextAttachment | TextAttachment |
|
TextHighlight | TextHighlight |
|
TextBinding | TextBinding |
|
TextShadow TextInnerShadow |
TextShadow |
|
TextBorder | TextBorder |
|
TextBackgroundBorder | TextBorder |
|
TextBlockBorder | TextBorder |
|
TextGlyphTransform | NSValue(CGAffineTransform) |
|
TextUnderline | TextDecoration |
|
TextStrickthrough | TextDecoration |
|
TextBackedString | TextBackedString |
| Demo | Attribute Name | Class |
|---|---|---|
|
Font | UIFont(CTFontRef) |
|
Kern | NSNumber |
|
StrokeWidth | NSNumber |
|
StrokeColor | CGColorRef |
|
Shadow | NSShadow |
|
Ligature | NSNumber |
|
VerticalGlyphForm | NSNumber(BOOL) |
|
WritingDirection | NSArray(NSNumber) |
|
RunDelegate | CTRunDelegateRef |
|
TextAlignment | NSParagraphStyle (NSTextAlignment) |
|
LineBreakMode | NSParagraphStyle (NSLineBreakMode) |
|
LineSpacing | NSParagraphStyle (CGFloat) |
|
ParagraphSpacing ParagraphSpacingBefore |
NSParagraphStyle (CGFloat) |
|
FirstLineHeadIndent | NSParagraphStyle (CGFloat) |
|
HeadIndent | NSParagraphStyle (CGFloat) |
|
TailIndent | NSParagraphStyle (CGFloat) |
|
MinimumLineHeight | NSParagraphStyle (CGFloat) |
|
MaximumLineHeight | NSParagraphStyle (CGFloat) |
|
LineHeightMultiple | NSParagraphStyle (CGFloat) |
|
BaseWritingDirection | NSParagraphStyle (NSWritingDirection) |
|
DefaultTabInterval TabStops |
NSParagraphStyle CGFloat/NSArray(NSTextTab) |
# 安装
### CocoaPods
1. 在 Podfile 中添加 `pod 'BSText'`。
```
source 'https://github.com/CocoaPods/Specs.git'
platform :ios, '8.0'
use_frameworks!
target 'MyApp' do
# your other pod
# ...
pod 'BSText', '~> 1.0'
end
```
2. 执行 `pod install` 或 `pod update`。
3. 导入模块 `import BSText`,OC 项目中使用 `@import BSText;`。
### Carthage
1. 在 Cartfile 中添加 `github "a1049145827/BSText"`。
2. 执行 `carthage update --platform ios` 并将生成的 framework 添加到你的工程。
3. 导入模块 `import BSText`,OC 项目中使用 `@import BSText;`。
### 手动安装
1. 下载 BSText 文件夹内的所有内容。
2. 将 BSText 内的源文件添加(拖放)到你的工程。
3. 链接以下 frameworks:
- UIKit
- CoreFoundation
- CoreText
- QuartzCore
- Accelerate
- MobileCoreServices
4. 导入模块 `import BSText`,OC 项目中使用 `@import BSText;`。
### 注意
你可以添加 [YYImage](https://github.com/ibireme/YYImage) 或 [YYWebImage](https://github.com/ibireme/YYWebImage) 到你的工程,以支持动画格式(GIF/APNG/WebP)的图片。
# 文档
本项目目前还没有生成在线文档,你可以在 [CocoaDocs](http://cocoadocs.org/docsets/YYText/) 查看 YYText 的在线 API 文档,也可以用 [appledoc](https://github.com/tomaz/appledoc) 本地生成文档。
# 系统要求
该项目最低支持 `iOS 8.0` 和 `Xcode 10.0`。
# 已知问题
- 与 YYText 一样,BSText 并不能支持所有 CoreText/TextKit 的属性,比如 NSBackgroundColor、NSStrikethrough、NSUnderline、NSAttachment、NSLink 等,但 BSText 中基本都有对应属性作为替代。详情见上方表格。
- BSTextView 未实现局部刷新,所以在输入和编辑大量的文本(比如超过大概五千个汉字、或大概一万个英文字符)时会出现较明显的卡顿现象。
- 竖排版时,添加 exclusionPaths 在少数情况下可能会导致文本显示空白。
- 当添加了非矩形的 textContainerPath,并且有嵌入大于文本排版方向宽度的 RunDelegate 时,RunDelegate 之后的文字会无法显示。这是 CoreText 的 Bug(或者说是 Feature)。
# 许可证
BSText 使用 MIT 许可证,详情见 LICENSE 文件。